


Fast and Simple Guide to Making Laser Cut Acrylic Earrings
So, you're ready to craft some fabulous acrylic earrings with a laser cutter? Great choice! Lasers are cool. You can use lasers to make amazing things. With OMTech's CO2 Laser Cutters and Engravers by your side, you'll soon be venturing into realms of creativity that make even the most fantastic ideas come to life.
Meet Your Companions to Make Acrylic Earrings
Before diving into the detailed guide on how to make acrylic earrings, take a moment to select your acrylic partners.
Your Main Tool: The Laser Cutter and Engraver
At the heart of your creative journey is the perfect tool—your laser cutter. Take, for example, our MF1220-50W and AF2440-100W models. Both are incredible hybrids of high-powered technology and user-friendly design.
Here's the cool bit. The MF1220-50W is compact yet capable, a perfect start for beginners or small-scale creators. If you have a very small workspace, you can also consider our desktop CO2 laser machine.
On the other hand, if you need a powerhouse that can handle larger workflows, the AF2440-100W is the beast you're after. Think of them as your paintbrush and palette in the laser cutting and engraving pantheon. Now that you've got your tools let's dive in!
Safety First! (No Exceptions)
While humor and fun are always welcome on this journey, safety definitely comes first. Ensure you know your safety measures like stop buttons, interlock systems, and protective enclosures to keep things carefree yet secure. Have fun, stay safe, and make cool stuff.
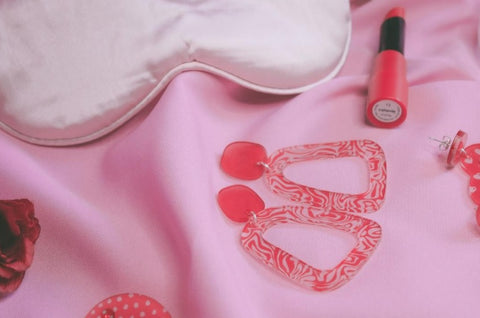
The World of Acrylic: Get Creative
The world of acrylic jewelry offers endless possibilities—transparent, translucent, or opaque. You'll find colors and finishes that will spark your imagination. Don't forget to add hooks, studs, and other accessories to complete your masterpiece.
How to Make Acrylic Earrings with a Laser Cutter
To show you how to laser cut acrylic earrings, here we give you a step-by-step guide. The machine used here is a 55W CO2 laser machine of which the production has been stopped, but the steps apply to other CO2 laser machines.
Step by Step: Laser Cut Acrylic Earrings
Ready to turn your concept into a tangible creation? Just follow these easy steps:
Step 1. Prepare the Material
Gather the necessary materials: one 12x20 1/8 inch black galaxy acrylic sheet (masked both sides), design drawing, CO2 laser cutter, safety glasses, water, paintbrush, white acrylic paint, toothpick, earring stud backs, and glue.
For the pattern used in this guide, you can download it here. You can also use LightBurn or other drawing software to design the earring pattern and unleash your creativity.
For the safety glasses, make sure it is rated for CO2 laser machines.
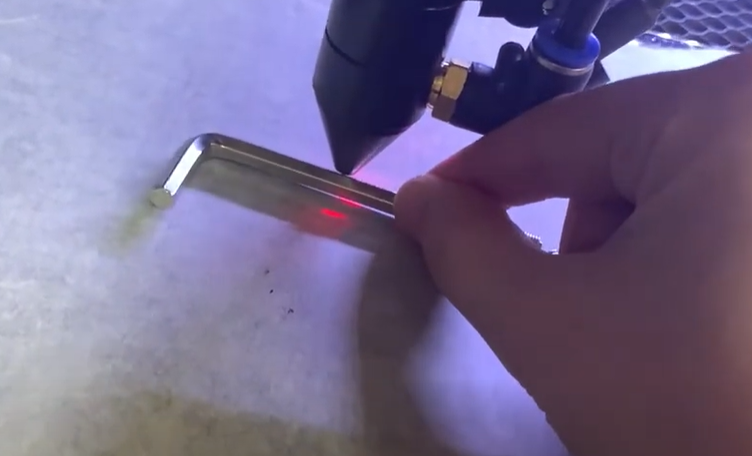
Step 2. Adjust Focal Height
First of all, turn your laser on, and put the acrylic on the honeycomb. In this guide, we use an Allen wrench to adjust focal height. Once it's positioned under the laser, you are good to go. Now, close the hood.
Note: if you notice there are a lot of jagged edges, you can try bringing it out of focus to get a cleaner line.
Step 3. Select Settings and Frame the Cut
You can use a USB cable to connect your computer and the machine directly or through Ethernet if supported. The design software used in this guide is LightBurn. Here are the machine settings:
Engrave: 180 speed, 28 power at 249 LPI
Cut: 14 Speed, 40 Power
Next, click Frame on LightBurn to make sure the machine cut and engrave where you want it to.

Step 4. Laser Cut Acrylic Earrings
Now everything is ready. Click Start button on LightBurn or press the Start button on control panel of the machine. The laser cutter will cut out the earring shape from the acrylic sheet.
Step 5. Clean the Acrylic
Wait for a few minutes before opening the hood to avoid the strong acrylic fumes. Wash the acrylic sheet with water to remove dust and debris from the cutting process.

Step 6. Paint the Acrylic
Apply a coat of white acrylic paint evenly on the acrylic sheet using a paintbrush. Use a toothpick to smooth out the paint and ensure even coverage. Now, allow the paint to dry completely.

Step 7. Assemble the Acrylic Earrings
When the paint is dry, peel the masking paper. Attach the earring stud backs to the earrings with glue, ensuring they are secure.

Congratulations, your gleaming earrings have come to life!

Remember, in the realm of creativity, you're the master — from minimalist shapes to intricate patterns, everything's within your reach.

While excitement is in the air, remember to work in a well-ventilated area and test your design on a scrap piece of acrylic first.
Here is also a video for your reference.
Conclusion
Making stunning acrylic jewelry is a fun and rewarding venture with OMTech's versatile CO2 Laser Engraver and Cutters. No matter your skill level, the user-friendly MF1220-50W or the robust AF2440-100W stands ready to transform your creative aspirations into striking, tangible art.
Embrace the thrill of turning the abstract into concrete. Dive deeper to explore our variety of CO2 Laser Engraving and Cutting machines and find the perfect fit for your hobby or business. Backed by a dependable 2-year warranty, they are not just tools. Consider them your faithful companions, leading you on an exhilarating creative journey. Why wait? It's time to join the OMTech family and unlock your potential to create fantastic things for yourself, for your friends, for your family, or for your business!


![[2025] How to Choose the Best Embroidery Machine for Beginners](http://omtechlaser.com/cdn/shop/articles/sewing-machine-creating-colorful-pattern.jpg?v=1742975979&width=200)
