


Setting Up Your OMTech Polar Desktop Engraving Machine
The highly anticipated OMTech Polar 50W Desktop Engraver has finally arrived and we are very excited to show you how to set up the machine and get started right away. This blog will also provide a general walk through of the Polar’s multifaceted features and functions.
The all-in-one OMTech CO2 laser machine is designed to be the best Glowforge alternative as a powerful and compact user-friendly machine, perfect for entry-level engravers or home offices. It is one of the most sought-after CO2 machines in the market right now as the purchase comes with every additional add-on you would need to easily etch designs on any small medium sized object.
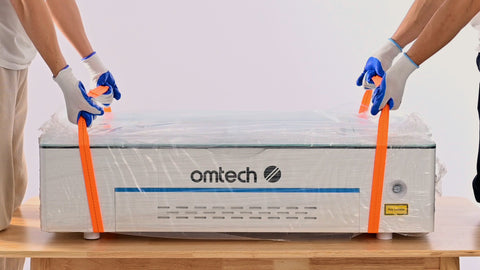
Unboxing the machine
The Polar machine is delivered with care in a large wooden crate. Feel free to repurpose the wooden crate as an engraving material later on. The machine comes with two visible orange straps, we would recommend at least 2 people to lift the Polar out of its crate as there is noticeable weight to it.
Take everything out of the wooden crate as there are additional engraving materials and 2 rotaries tucked away behind and under the machine. Remove all plastic film coating the laser machine and carefully lift the glass panel and you will discover all the additional equipment that is packed inside the machine.
What is included within the Polar?
Built-In
The Polar comes equipped with a built-in air assist system, cooling water pump system, 1.5L of OMTech antifreeze coolant, ammeter reader, wifi card, a built-in exhaust fan, a 5MB panoramic fish-eye camera, a rear pass through and a laser key.
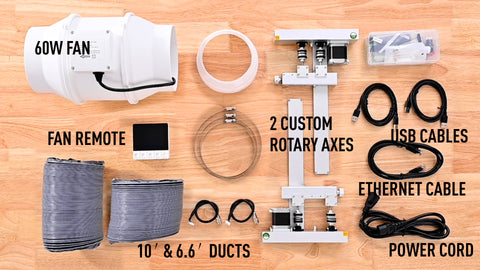
External Add-ons
There are many other things included unattached to the machine including a 60W fan, a fan remote controller, an inline fan adaptor, multiple adjustment clamps, 2 duct tubes (5-meter total length), 2 custom rotary axis, a large honeycomb bed, USB cable, ethernet cable, power cord and a tool box.

Inside the clear toolbox:
(Cotton cleaning tools, USB drive, screwdriver, hex wrench, remote interlock connector, O ring replacement, access keys, rulers, tape, target disk and a Polar manual)
Engraving Materials

The box also comes with five 3 mm pieces of acrylic, basswood, and cardboard so that you are able to start testing out the machine and engraving your designs right away!
Setting Up External Exhaust System

- First, you’d want to make sure that your fan is facing the correct direction for it to work, follow the arrow listed on the inline fan itself to determine which way to face your fan.
- Install the 5-inch duct adaptor to the inline fan and screw it tightly using an adjustment clamp.
- Take your 5-inch duct tube and slide it over the rear ventilation port of the Polar. Once it is fully enclosed over the rear of the machine, use an adjustment clamp to securely tighten the duct tube to ensure that it doesn't fall off when operation begins.
- Slide over the other end of the 5-inch duct tube and connect it to the 5 inch duct adaptor that is already connected to the inline fan, securely tighten it using another adjustment clamp.
- Connect the larger duct tube to the other side of the inline fan and securely fasten it with an adjustment clamp.
- Plug in the inline fan to a power outlet, install AAA batteries to the fan remote and your fan is ready for use!
Starting the Machine
Firstly, connect the power cord to the machine with a power outlet. Take the remote interlock connector (the second safety key) out of the toolbox and plug it into the port next to the power switch. Turn the front laser key clockwise and switch on the machine by pressing the start button. The start button begins, pauses, and resets the engraving process. The ring color around the button determines the Polar’s current engraving status.
|
Status Color |
Meaning |
|
Blue |
Laser is currently active |
|
Green |
Laser is ready to work |
|
Red |
Error or malfunction |

Open the front debris tray and slide your honeycomb bed right into the Polar. Connect the USB cables into your device, connect the second USB cable if you want to use the panoramic camera function. Remember to tune the beam attenuator next to the power switch to adjust the laser power, you can see the laser power on the digital ammeter next to the Polar work bed.
Setting Up Connection and Lightburn Walkthrough
Your Polar machine can be connected to your computer using a USB cable. Feel free to download the Lightburn software onto your computer if you haven’t already done so. Your Polar device also comes with a copy of RDWorks software located on the USB flash drive provided in the toolbox. For more information on RDWorks and the full technical functionality of the device, please read our comprehensive Polar manual.
Easy Lightburn Set Up:

- Change the unit of your software to millimeters at the top left to have higher accuracy compatible with our work bed measurements.
- Head to the bottom right corner of the screen and select devices, click on find my laser and it will begin scanning for the Polar controller. Be sure to select the machine that has an X-axis of 510 mm and a Y-axis of 300 mm.
- Make sure to select the origin of the laser position as rear right to avoid any mirroring or upside-down imaging issues later on.
- Your laser is ready to use when the word ready is indicated under the laser title.
- Use the move function in Lightburn to move the laser head around and press the home button to return the laser to its original rear right position.
- OMTech recommends that the work distance needs to be 17 mm from the laser head, and you need to subtract it with the thickness of work material. Hence, if the material you’re working with is 5 mm, you would input 12 mm into your Z-axis distance column.
- Load a file into your Lightburn workbed, adjust your speed and max power setting by clicking Spd/Pwr on the right and you are ready to begin your engraving process.
- Hit the frame button to predetermine the area of the material you are going to cut and click start when you are ready to engrave!
Setting Up Rotary Axes
A rotary axis attachment is a specialized laser engraving accessory that allows you to engrave round or cylindrical items such as mugs, tumblers, glass flutes and more. The OMTech Polar comes with 2 separate 4-wheel rotary axis devices, Rotary Axis 1 is used for larger cylindrical items and 2 is used for smaller materials.

Easy Rotary Set Up:
- Firstly, remove the debris tray and honeycomb work bed from your Polar Engraver.
- There should be an open rectangular bay at the bottom of the machine. Place the rotary system at the bottom of the machine and align it to the lower left corner of the bay.
- Connect the rotary axis to the back of the machine’s aviation socket after removing the rubber cap.
- Flick the rotary switch on to begin powering your rotary system.
- Gently align your X-axis rail and laser tube above the work area to match the marked yellow stickers according to which rotary you are using. Rotary 1 should be aligned with the yellow sticker 1 on the right side of the bay and rotary 2 should be aligned with the yellow sticker that says 2 on the left side of the bay.

- Carefully place the object onto the rotary axis, measure the distance and adjust the z- axis laser height accordingly using the ruler from the toolbox.
- Start engraving your objects! When you are done using the rotary, remember to revert everything back to its original position.
Conclusion
Using a new machine with many different functions can seem intimidating. However, the OMTech Polar 50W Co2 Desktop Engraver is one of the most user friendly and convenient laser machines out there today. It also comes with almost every additional accessory a laser engraver enthusiast can only dream about, so you don’t have to worry about purchasing extra accessories. Get your OMTech Desktop CO2 Laser Engraving Machine now if you haven’t already. See how the brand new OMTech Polar fairs with Glowforge machines in this article:
Better than Glowforge? Introducing Polar 50W Desktop Laser Engraver by OMTech
For a more comprehensive guide to setting up and getting all the specific details regarding the Polar, download and read our complete Polar 350 manual now.
OMTech wishes you happy engraving and hope you continue to beam with endless possibilities!


