


How to Use Lightburn Software: Your First Laser Engraving
Laser engraved with the best laser software: LightBurn. Learn all the LightBurn software basics for your CO2 laser engraver, engraving vector and raster images, using layers, importing design files, and how to laser cut your first project! Look no further; this comprehensive guide will teach you how to use Lightburn software.
Introduction to Lightburn Laser Engraving Software
There have been several laser software packages developed over the years that can drive a CO2 laser engraver. These useful programs take the image on your computer screen, convert it to a format that the laser understands, and finally send the data to the laser. However, one such laser software tool has evolved and become the de facto standard, the one that all the professionals have heard of and the one that most people recommend. Welcome to LightBurn laser software.
What is Lightburn Laser Engraver Software?
Lightburn is an essential part of your laser engraving journey! OMTech products utilize Lightburn software because of its user-friendly interface that allows users to import, edit, and create designs that are then turned into directions for your laser machine. With Lightburn, you’re able to control every step of the creation process!
Lightburn software has evolved over the years to not only be a laser control system, but also an advanced design and editing tool that can be used to create your designs from scratch or to convert and manipulate existing designs. It is therefore worth spending the time to learn all of the Lightburn software features and to understand how it works. Lightburn runs on both Windows and Mac computers.
How Much Is Lightburn Software
Luckily, Lightburn only incurs a one-time cost, meaning that you won’t have to pay a monthly or yearly subscription like other software for laser engraver machines.
OMTech has several options for Lightburn. Software costs range from $59.99 to $149.99, depending on the power and type of laser machine. We offer Lightburn software for our CO2 laser engravers and fiber laser engravers.

The Basics: How Raster Images Work
Before we start looking at the various features of Lightburn laser software, we need to understand that Lightburn works and manipulates vectors. You are likely very familiar with JPG, GIF, and PNG files. We see these Raster file formats every day on the Web. Raster images are made up of tiny pixels, making them resolution-dependent and best used for creating photos. If you zoom in you can begin to see the tiny pixels and the image becomes less and less distinct.
Vector graphics are images that are rendered using a mathematical formula, something similar to giving someone directions: go 10 yards, turn left, go 2 yards, turn right …. and so on. That means that the same formula works whether you specify inches, yards, or miles, and in a similar way, a vector image can be miniaturized or expanded as much as you want and will always retain the same quality. This is what we work with in Lightburn laser software.

Vector Nomenclature: How Vector Images Work
When editing vectors, Lightburn uses ‘nodes’ as the fixed points of the image and ‘paths’ that connect the nodes. A node can be the corner of say, a rectangle but as most images consist not just of straight lines, but also curves, each node can also start or finish a curve that is controlled by ‘handles’. If you grab a handle with your mouse and move it, the line (path) that is attached to that node is stretched and curved - it takes some getting used to but it is one of the features of the Lightburn software that makes it so powerful.
How to Use LightBurn Software
Setting up your Laser in LightBurn
Before we get into the design features of the Lightburn Laser Software, we start by connecting your OMTech CO2 Laser Engraver to the computer and ensuring that it can talk to the software. Connect your OMTech laser to the computer with a USB cable. Although you can load files onto a USB thumb drive and plug them into the Laser, controlling it through a USB connection is by far the easiest way. Advanced users can also use Ethernet IP connections.

Once connected, open your Lightburn laser software and click on Laser in the Windows menu item. This will open the Laser dialog window on the right-hand side.

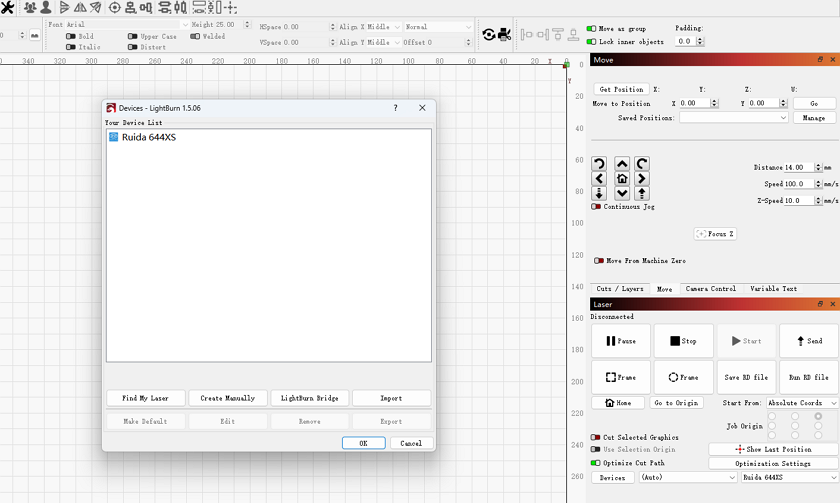
Now, click on the Devices button and when the new window opens, click on Find my Laser. This will open a window asking you to ensure that the USB cable is connected (don’t forget to your laser cutter on) and after clicking OK, the Lightburn software will automatically find the new laser.

It should automatically recognize the laser controller as being Ruida, and you can now give it a name (important if you have more than 1 laser cutter connected to the computer), and specify the size of the laser cutter bed. Note that most of the Lightburn software works in the metric system, so measurements are typically in millimeters (mm).
Finally, you will be asked where the Origin of your laser is and typically this is in the Right Rear of the bed although you can change this later if you wish.
You will now be presented with a confirmation of your settings and the setup is complete.
LightBurn Basics: The LightBurn Workspace
The Lightburn software interface can seem a little daunting at first, but it is well laid out and you will quickly get used to it.
The icons along the top are shortcut buttons for the Menu items. You can ignore them to start with and just use the menu until you become more familiar with them. The really interesting buttons are down the left-hand side, along with the colored boxes along the bottom.

Using Layers in Lightburn
We will start with understanding layers as this is a critical feature of Lightburn software and how it controls the laser cutter.
A layer comprises all of the lines and elements that have the same laser settings. So, as an example, imagine a simple design for a keyring — a name is engraved onto the wood and the wood is then cut out. Obviously, the power and speed of the laser need to be different for the engraving than for the cutting out and so the lines for each are placed on different layers. One layer is set for the appropriate speed and power for engraving and the other layer is set for the speed and power for cutting.

Lightburn software gives us 30 different layers to play with, each can have its own settings for the laser including speed and power, as well as the ‘mode’ that is to be used, for example, a simple line, or a fill where the whole shape is engraved.
Two special layers, T1 and T2 are also provided. These are purely to draw layout guide shapes to say, align things, add notes, etc as they are never sent to the laser.
As you can see, each layer has a different color and all of the lines and elements on that layer will have the same color.

Change the speed, mode, and power of each layer in the Cuts/Layers dialog window choose whether that layer should be output to the laser or not. Layers can also be hidden completely as well as instructing the laser to switch the air assist on (cutting) or off (engraving), if you have automatic air assist controls installed.
One point to note is that layers are generally sent to the laser from the top to the bottom of the list, so use the ^ and v buttons to sort them - engraving should always be performed before cutting.
Designing Images in Lightburn Laser Software
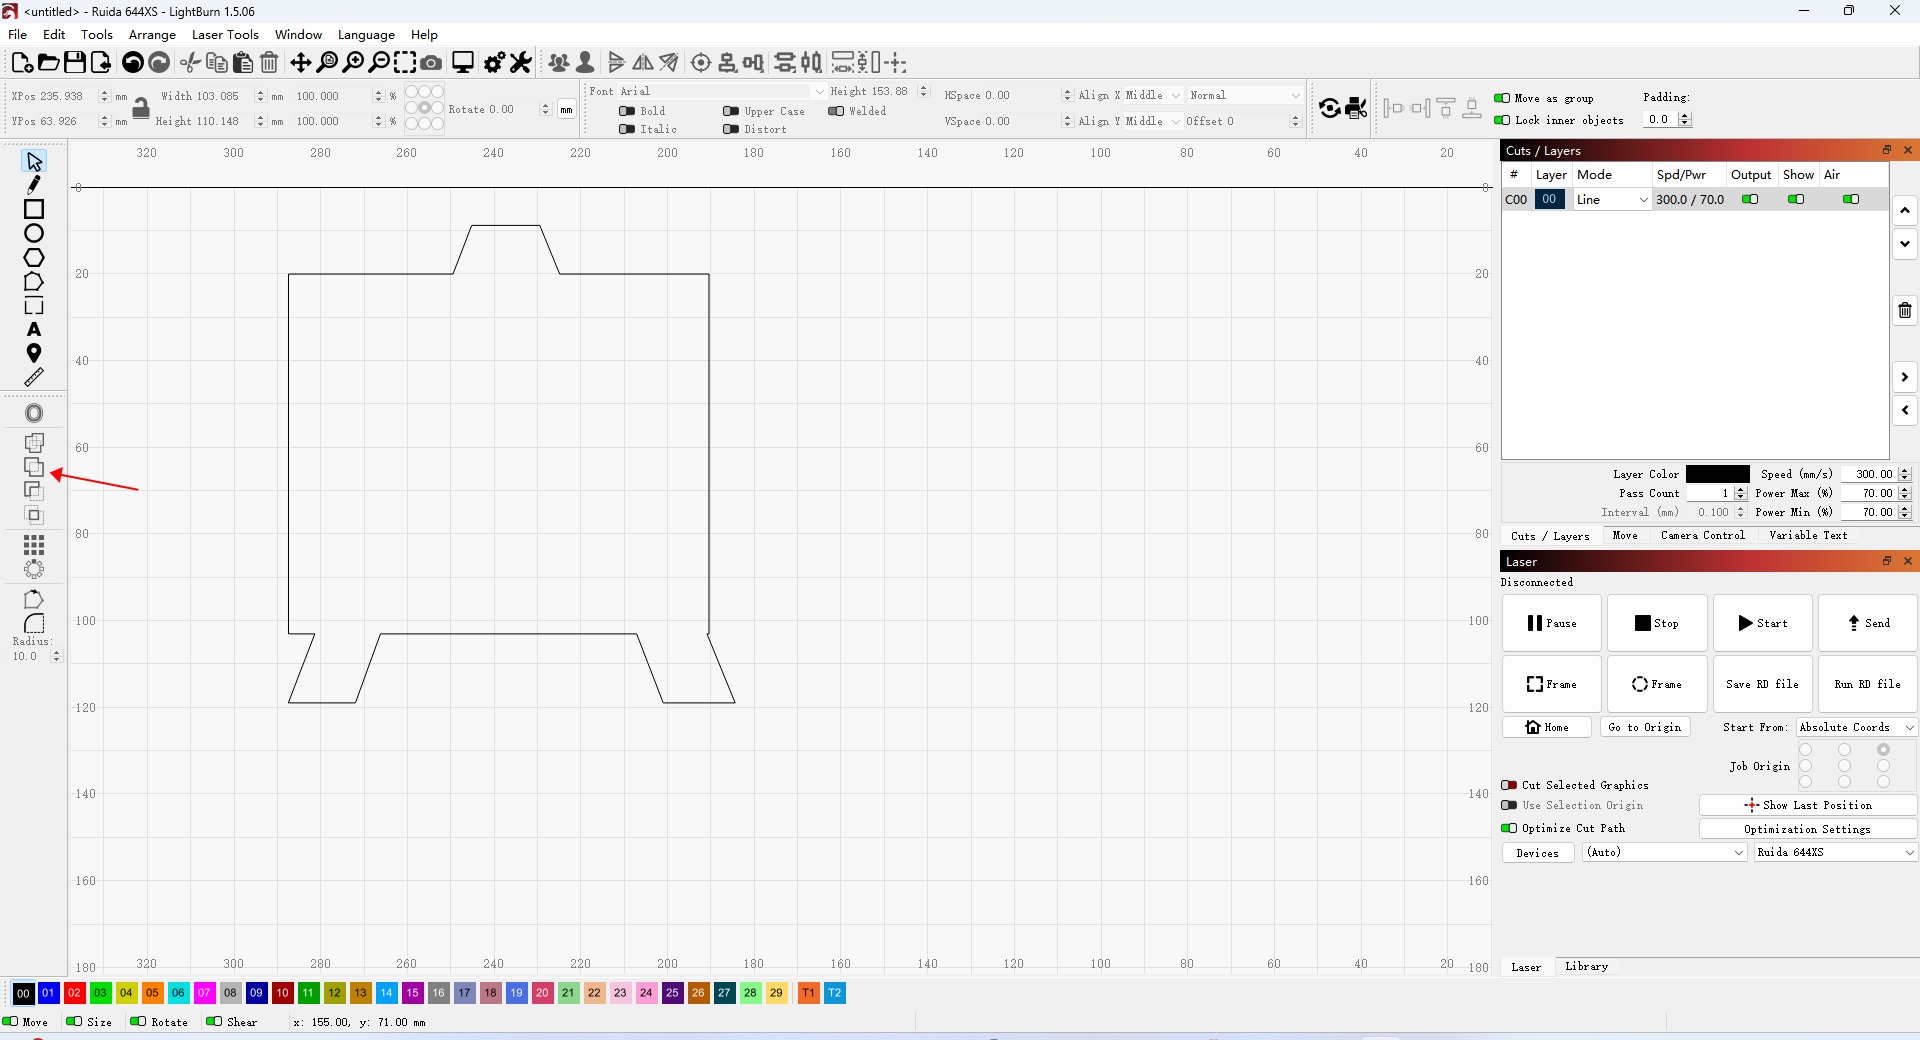
In the middle of the Lightburn screen, you will see a representation of your laser bed with the 0,0 origin in the top right corner.
On the left-hand side are a series of icons that give you access to some very creative tools. If you have used graphics software before, some of these will be familiar to you, however, remember that Lightburn software is working in vectors, so everything is comprised of nodes and handles.
Start by selecting the square icon and placing your cursor onto the bed and dragging out a square or rectangle (hold down the shift key to force it into a square shape).
When you have drawn the box, you will see that it is black and that a black layer has appeared in the Cuts/Layers dialog window. By clicking a different colored layer box you can change the layer of the square that you just drew.

The circle works in the same way — draw an eclipse or use Shift to force it to a circle and the hexagon creates hexagons.
Now there is an important thing to note at this point. As I said previously, Lightburn works with vectors comprised of Paths, Nodes, and Handles. However, the square, circle, and hexagon are known as ‘primitives’ and these are simple shapes that have not yet been converted into paths. The advantage of this will become obvious when we get into editing the vectors but it is a good idea to keep the primitives for as long as possible until you find the need to edit them beyond the basic shape.
The other significant tool in the left-hand menu is the A, the text icon. Text can be added to any design using any font that is installed on your computer, so start by clicking A and then click on the bed. Start typing and the text will appear in the currently select font and size which you will see at the top of the screen. You will also see additional text controls that allow you to adjust the appearance and layout — experiment with these to understand how they affect your text.
Again, the text is stored as primitives but you will have the ability to change this later.

The next tool is called the Offset Shapes tool and this is extremely useful when you understand how it works.
Start by selecting the square that you drew early (use the arrow at the top of the left-hand icons to choose the Select tool). When selected, the square will turn into ‘marching ants’.
Select the Offset Shapes tool and a dialog window will appear and you can select whether you want the offset to be inwards or outwards, how far you want it to be from the original and whether you want the original to be deleted afterward. Experiment with the settings and observe how they affect the result.
How to Laser Cut Your First Project in LightBurn
The best way to learn and become comfortable with Lightburn software is by using it. So, this first project is an ideal starter. You will need some 1/8th (3mm) plywood and already know the laser settings for engraving and cutting this material. See the Laser Test Card instructions for more information on this.

Step 1: Using the text tool, write your name on the bed in text that is 15mm high.
Step 2: To the left of your name, draw a small circle about 5mm in diameter. You can do this manually or after you have created it, use the Width and Height boxes in the top bar to set them manually (Hint: the padlock will force the height and width to be fixed together).
Step 3: Select both the text and the circle by clicking them with the CTRL key pressed and then use the Offset Shapes icon to create an outside offset at 4mm.
Step 4: Select the text and set this to layer 02 (red), select the circle and set this to layer 01 (blue) and select the outside offset, and set this to layer 00 (black)
Step 5: Now select all of the items by using the select tool and dragging a box around everything and use the menu Arrange and Group to group all the items together. Now when you select it, you are selecting all of the pieces and if you move it around the bed, they all stay together.

Step 6: In the cuts/layer dialog, set layers 00 and 01 to your cut settings and layer 02 to the engrave settings.
Step 7: Now move the layers in the cuts/layer dialog in this order: Red (02), Blue (01), and Black (00). The reason that we have two cut layers is that we want to make sure that the hole is cut before the overall shape is cut. Lightburn is very good at working out that the inside holes should be cut first, but this is a foolproof way to ensure it and also gives you some practice with how layers work.
Step 8: Finally, send the job to the laser using the Laser dialog and you should end up with a nice keyring, complete with the hole for some string or ribbon.
How to Laser Cut Multiple Items with Array in LightBurn
You might decide that you like the keyring so much that you want to cut lots of them. Doing them individually will take a long time. However, Lightburn software has a feature called Array. This allows you to create a grid of items and they can be simple objects or grouped objects.
To create your array, I like to start by creating a guide that shows my workpiece on the bed. So if I have a piece of plywood that is 300x400mm, I create a rectangle that is the same size in Lightburn and assign it to the orange T1 layer. Remember that this layer is never sent to the laser, it’s there just to help lay out objects.
Select the keyring and place it in a corner of the guide rectangle and click the Array icon. Choose how many copies you want on both the X and Y axis and the spacing in-between. Adjust these until you fill your guide rectangle and when you send this to the laser, it will follow the cut/layers dialog to engrave and cut everything in the order that you have set. Now you have a mini production line!

Node Editing with LightBurn
Although many people see node editing as being an advanced technique, I believe that it is one of the most powerful features of Lightburn software, and something well worth getting to grips with as soon as possible.

As explained earlier, Lightburn retains the primitives (square, circle, text etc) in a form that allows them to be resized and manipulated as easily as possible. However, at some point you will want to edit these more precisely, changing their shapes by adding more points or lines. Lightburn allows you to do this by selecting the item and then using Edit and Convert to path in the menu. Note that this cannot be reversed.
When an item has been converted to a path, you can access the individual nodes that make it up. For a square this is simply a node at each corner with a straight path drawn between them all. You can edit these nodes, moving them, deleting them or adding more by using the Node Editor.

Select the Node Editor icon from the left hand menu and select the square that you converted to a path. The square is now selected with marching ants, along with each node. One of the nodes is green and this represents the start of the shape.
By clicking on a node, you can drag it to a new position. By hovering over a node and pressing d on the keyboard you can delete it and by placing your cursor on a path and pressing i you can add (insert) a node.
If you convert the circle you created to a path, then each of the nodes has handles. A handle turns the paths connecting nodes into curves. If you grab a handle and move it you can see how it changes the path.
Node editing is very powerful and gives you extreme editing ability for any design. It takes some practice to master but you will find it well worth the effort, but understand that you can only use the node editor if the object has been converted to a path and is not part of a group.
Welding and Joining
The final part of this introduction to Lightburn Laser Software as welding and joining. You have already seen how grouping works, but you will frequently need to join 2 objects together so that any overlapping lines are not sent to the laser. Imagine two overlapping boxes. If they were sent to the laser then it would cut out 2 boxes - the top one would be complete and the bottom one would be missing the overlapped piece. By welding them together, they become a single item that takes the shape from the outside of the two boxes. Note that you can weld but you cannot ‘unweld’. You can weld multiple objects at the same time by selecting them all but you cannot weld groups.

The Boolean modifiers (union, difference, and intersection) are quite difficult concepts to understand in the beginning but are very powerful and they enable some spectacular designs to be created.

Union works in a similar way to Weld but only works on 2 objects, however, these can be groups - so for example you can perform a union on the text and another object.
Difference, or subtraction, will remove the area where the second selected shape overlaps the first shape. The order in which you select shapes will determine the outcome. This also works with grouped items.

Intersection creates a shape from 2 selected shapes that have an outline defined by only the areas in which the shapes overlap. Again, this also works with grouped items.

Experiment with these using for example a circle and some text to fully understand how each one works and remember that the order in which the two items are selected will affect the result.
How to Import & Edit a Design in LightBurn
As you have read, Lightburn has many powerful features, but for the final project I want to introduce you to the trace feature and together we can create a stunning pendant.
Lightburn works on vector images but most images used on the Web are raster images such as JPG, PNG or GIF. However, we can import such a raster image and Lightburn can then trace it, converting it to a vector image. Now, this is not going to work well on a complex photo, but a clean JPG of a silhouette for example will be perfect.

This project will take a butterfly silhouette and import it into the Lightburn software using the menu File and Import. By selecting the image and using Tools and Trace Image from the menu to open up the Trace dialog window, Lightburn will create lines around dark areas to produce vectors. Normally, the default settings will produce a great result but you can make adjustments if needed. Feel free to experiment and zoom in to see how the results change.

By selecting ‘Delete image after trace’ we can remove the raster image and simply leave the traced vector.
Let’s turn this butterfly into a simple pendant.
Step 1: The first thing we need to do is ungroup the vector as Lightburn traces an image into a single, grouped object.

Step 2: When cutting wood, it is always best if there is a little space between multiple cuts or cuts and engraves. This prevents the wood from breaking or getting damaged. The inside of the wings, which we will be cutting are a little too close to the lines that we will engrave and so we can select all 4 of these and apply an Offset Shape to them using a 2mm Inside contour, deleting the originals.
Step 3: Now we can add a circle above the butterfly which will be our hole for the ribbon.

Step 4: Select the outside of the butterfly and the circle and choose the Offset Shapes. Apply an outside offset of 34mm (you can adjust this as needed) but do not delete the original. Then use Arrange and Ungroup to split up the new items.
Step 5: We can select the new circle, the 4 inner holes in the wings, and the small cutout that has appeared under the circle and set these are layer 01 (blue).

Step 6: Select the outside of the butterfly and chose layer 02 (red)
Step 7: In the Cuts/layers dialog window, make sure that the layer order is 02 (red), 01 (blue), and 00 (black). Adjust the 02 red layer to your engrave settings, and the 01 (blue) and 00 (black) layers to your cut settings. You can choose whether to set the 02 (red) layer to simply engrave the outline of the butterfly using the Line mode or to fill it with the Fill mode.
Step 8: Select everything by dragging the select cursor around it and using Arrange and Group in the menu to group them.
Step 9: Now grab the corner of the group and resize it - hold down the shift key to ensure you do not change its aspect ratio. Decide what size will work best for you.

Step 10: After setting up your laser, powering it on, ensuring the water is switched on and below 20C and your air is flowing, send the file to the laser through the Laser dialog window.
Conclusion
As you can see, Lightburn offers some very powerful features and the aim of this article is to give you the confidence to delve right in and have a go. There are many advanced features in LightBurn that you will get to know as you do more and more.


